Menu

Esders Connect

Our online portal for the documentation of measurement data as well as device and order management offers users the opportunity to digitize their processes and thereby increase their productivity.

Icon Esders Connect Logo

Discover Esders Connect, your solution for easy data management and seamless integration with world-class customer support. Send us your contact details to receive a personalised demonstration and learn how Esders Connect can transform your business!

How does it work?

You can manage your measurement data in the Esders Connect online portal in a paperless and GDPR-compliant manner. Here, the data of your measuring devices is clearly displayed and can be viewed by every registered employee of your company. Use the Esders Connect online portal in addition to managing your devices, your orders and configuring settings in devices and reports. You can easily transfer changes to device settings to your measuring devices using the Esders Connect app.

Kommunikation smart memo von der Baustelle direkt ins Büro
Data transmission with the smart memo and integrated LTE module

The Esders Connect online portal and the Esders Connect app give you full flexibility in managing your measurement data, devices and orders.

Your advantages

  • Direct creation of test reports on site
  • Send measurement data via LTE or Bluetooth and app
  • Paperless documentation and centralised digital management of your measurement data
  • No software installation necessary
  • Direct access by any registered employee
  • Measurement data management and device management in one online portal
  • Certificates, operating instructions and other product-specific documents are available for download
  • Service scheduling at the click of a mouse
  • Data protection-compliant
  • request offer easily

General Q&A

  1. The Esders Connect online portal, accessible via any common browser.
  2. The Esders Connect app, available free of charge in the Google Play Store, the Apple App Store and for Windows.
  3. The Esders measuring devices, managed via the Esders Connect online portal. Alternatively, measurements can be uploaded to the online portal.
  1. smart memo (built in LTE Modul, no app necessary)
  2. OLLI (App required)
  3. GasTest delta3 (App required)
  4. HUNTER / Laser HUNTER (App required)

You can manage devices or products, such as the download of certificates, operating instructions and other documents, for all products in the Esders Connect online portal.

The configuration of device settings only works for devices from the smart memo, OLLI, GasTest delta3, HUNTER or Laser HUNTER series.

In a measuring device with LTE module up to three email addresses can be lodged. These ones are tied to the respective device

In the Esders Connect app up to three email addresses can be lodged as well. These ones are free to be used for several devices.

In the Esders Connect portal up to four additional email addresses can be lodged. They can be assigned to a specific device or a number of devices even different types of devices, e. g. smart memo & GasTest delta3.

You can view and manage your collected orders (device orders, service orders, repair orders) in the Esders Connect online portal.

A one-time registration is necessary to use the Esders Connect online portal. If you are already registered as a customer with us, you can simply register with a mouse click in the online portal.

To use digital measurement data management, you must have a measuring device from the smart memo, OLLI, GasTest delta3, HUNTER or Laser HUNTER series.

To transfer device settings or upload measurements on devices without an integrated LTE module, you need the Esders Connect app.

Use of the Esders Connect online portal and the download and use of the Esders Connect app is free of charge. When using digital measurement data management, costs are incurred for sending measurements. The fee is independent of the number of email addresses entered and is charged for each measurement file sent.

Alternatively, an annual fee can be booked for each measuring device, with which any number of measurements can be sent from this device.

When purchasing a smart memo with LTE function, for example, a measurement package is included that allows you to send 100 measurements.

Please speak to our sales staff about the costs incurred.

Arbeitsplatz Esders Connect

The Esders Connect online portal

The Esders Connect online portal is our central and digital place to manage your measurement data, your devices and your orders. With your personal access data, you or your colleagues can log in from anywhere at any time and benefit from the advantages of paperless documentation and management.

Measurements and reports

Your collected measurements are managed and clearly displayed in the Esders Connect online portal. You have the option to filter according to different criteria and to display only selected measurements. If required, you can either view a complete PDF report of your measurement, download lists of measurements or simply download measurement data in table format. If you want to correct additional data (MDE) on a report, you can conveniently change this in the respective measurement and immediately generate a corrected PDF report. The creation of device groups allows you to configure different settings for several devices at the same time, e.g. several master data records, which are automatically printed on the report header of the PDF file. You can therefore create a group with your own “branch office” master data for each branch. In addition, you can use device groups to configure special device settings, e.g. the configuration of the additional data (MDE), which is queried in a check (by default “order number”, “postcode, town”, etc.).

My devices

By directly linking the measurement data management with the device management, you can easily access the most important data of your device in the “My devices” area. Here you can find general information on the device, assign devices to a contact person and automatically see documents such as the latest version of the operating instructions and certificates. We show you the order data for the sales process of the device, the next service due date and we tell you if a new software version is available for your device.

My orders

Under “Orders“, you receive a complete list of all orders, e.g. service orders, new device orders, repair orders, etc. For each order, you can view details and check the current status of an ongoing order.

You have the option of booking a service for each device under “My devices“, which is then listed under “My orders“. Likewise, you get an overview of your current credit for using the digital measurement data management under “My Credit Balance“. With the help of the listings, you can evaluate how many measurements have been sent from which device.

Q&A to Esders Connect online portal

By default, 10 entries are displayed in the measurement data overview (display can be adjusted in the lower area of the measurement list). The list is not filtered and sorted by execution date of the measurement. In the simple search, you can filter by “Menu” (test name), serial number of the device or a time period so that only those measurements that meet the set criteria are displayed. After selecting a new search parameter, you must update the measurement list. In Advanced Search, you can create additional search criteria to further narrow down the list of measurements. Use “Other filters” to create a new row and set search parameters individually. All set search parameters can be deleted using the “Thumbplate” button on the right-hand edge of the filter search.

You have the option of filtering a measurement by entries from the additional data (MDE) in the filter search. To do this, you must allow filtering once by going into the details of a measurement. If you have marked an entry with a yellow asterisk in the additional data, you can select a corresponding search parameter in the filter search via “other filters”.

If you need to correct or amend entries in the additional data (MDE) because you have not made it on site or the entry is incorrect, you can correct this in the details of a measurement. The entries made are displayed here. If you have the appropriate authorisation (“Edit measurements”), you can change the entries and display the corrected report directly. Confirm the completion of the changes with “Save”.

PDF reports for each measurement are automatically provided in the measurement overview in the “Measurement data management” – “Measurements” area. For individual measurements, click the download arrow directly in the measurement tab. If you go into the “Details” of an individual measurement, you can choose between downloading a report (PDF file) or a measurement data table (csv file) via the download arrow in the menu header.

If you want to export several measurements at the same time, please use the download arrow in the search filter area in the measurement data overview. Here you can choose whether you want to download a single PDF file or a single csv file (measurement data in table format) for each selected measurement. This download arrow exports the entire displayed measurement list. Use the “Entries per page” setting in the bottom bar of the measurement list to restrict/extend the measurement list.

In the “device management” – “my groups” area, you can create your own group, e.g. for several branches. You can set your own settings for each group. This can be, for example, different master data that is automatically displayed on the report header of a measurement. You can also define your own configuration of the additional data (MDE) in the device for a group. You need the “Edit groups” authorisation to manage groups.

You can create a new group with the “plus” symbol. The “pen” symbol in the group name takes you to the group and you can change settings or delete the group.

By default, all devices assigned to you are in the “default” group. If you have created another group, you can now drag and drop individual devices (click, hold and drag devices) into the white field of another group.

You must confirm the changes to groups by clicking “Save”.

In the “Device management” – “My groups” area, you can change the settings of a group using the “pen” symbol. In the group, you can edit the group name and change the master data. You can change the logo displayed on the reports using the “plus” symbol in the logo.

Confirm the changes to the group settings with “Save”.

In the “Device management” – “My groups” area, you can change the settings of a group using the “pen” symbol. In addition to the e-mail addresses entered in the devices, you can permanently define 4 additional e-mail addresses here to which the report is always sent.

Confirm the changes to the group settings with “Save”.

In “Device management” under “My groups”, you can change the settings of a group via the “pencil” symbol. Using the checkbox “Edit of additional data (MDE)” you can give permission that the additional data (MDE) of a measurement may be edited subsequently with the Esders Connect app. The permission applies to all devices in the respective group. So if you have all devices in the “Default” group and give permission for this, all measurements may be edited with the Esders Connect App. You must confirm the changes to the group settings via “Save”.

You can configure the additional data (MDE) of a device either in the “device management” – “my devices” area after going into the details of the corresponding device. Editing can be started via the note symbol “Edit MDE”.

Another option is in the “Device management” – “My groups” area. Here you can set the configuration for individual devices as well as for a complete group of devices.

In the “My groups” area, find the device for which the configuration is to be changed and click on the “note” symbol. A list of menu items installed on the device now appears. For each menu item, a configuration of additional data (MDE) is stored as standard (our factory setting). By clicking on a menu item, you can change the configuration (see details in the next question). 

Confirm the change to the configuration with “Save”.

If you are back in “My groups”, you can transfer the configuration of a device to an entire group via “apply MDA”. Therefore, define the group (destination) to which you want to transfer and define the individual device (source) from which you want to transfer. As soon as you confirm with “Save”, each device of the selected group is equipped with the set configuration.

For each menu item, a separate configuration of additional data (MDE) can be set separately, which is requested in the device during the test. The entries made for the additional data (MDE) are automatically placed on the PDF report for each check. The first four entries are always displayed in the report header of the PDF report (in the field at the top left). All further entries are placed as an additional table on the second page of the report. Depending on the menu item, there is space for more or fewer entries on the second page of the report. Usually there is space for 7-8 text entries, i.e. 4 on the report header and 4 on the second page. Signature fields are handled separately. For each entry you can define the “Designation” (name) of the entry and the type. The selection “Type” includes text (normal text entry), checkbox (selection ticked or not set), signature (signature) or drop-down (you can specify several selection options which can be selected in the device). The selection “Print” defines whether an entry is printed on the thermal printer report. The selection “Apply after measurement” defines whether or not an entry in the device should be accepted for a follow-up measurement. Use the “Plus” symbol to create a new entry that you can configure. The selected line is deleted using the “X” symbol in a line. You must confirm the changes to the MDE configurations by clicking “Save”.

Yes, that is possible. To do this, the MDE configuration of the device must be edited accordingly in the Esders Connect portal. The “Edit groups” authorisation is required for this task. The appropriate device must be selected in the portal under Device management -> My devices. There, the MDE configuration for each menu item can be edited using the “Edit MDE data” button. Various MDE fields are usually already available for each menu item. For each MDE field, you can decide individually whether the value entered for it (e.g. the name of the inspector) should be automatically transferred to the next measurement protocol. To do this, the “Apply after measurement” checkbox must be ticked in the appropriate place. Once all fields have been configured as required, the changes must be saved and then transferred to the device via the Esders Connect app.

In the “device management” – “my devices” area, you can view and export the stored documents and certificates for each device. Select the desired device from the list or find it via the search function. The “info” symbol takes you to the details of the device. Here you can download individual or all collected certificates or, for example, download the latest version of the operating instructions using the download symbol.

In the “device management” – “my devices” area, you have the option of booking a service for each device. Select the desired device from the list or find it via the search function. The “info” symbol takes you to the details of the device. The “Book service” button opens several service options for your device. Select the desired service and press “Save”. The selected service is now in your shopping cart, which is displayed at the bottom right of the page. You can either book another service for a device in your shopping cart or go directly to the shopping cart and order the service via “Requests”.

The “Orders” – “My orders” area shows you a list of all active and completed orders. You can view the details of an order using the “Info” symbol. You can use the search to filter by keywords, order numbers or types. You can export a list of all displayed orders using the download symbol.

Go to “Settings” – “User management”, you have the option of setting different authorisations for each user. To grant authorisations, you need the special powers of the “Admin”. By default, we provide 1-2 persons with “Admin” rights for your company. These are usually the people from your company who first registered as users in Esders Connect. If you personally do not have “Admin” rights, the contact details of your “Admin” will be displayed under “User management” so that you can contact them for the purpose of managing authorisations.

In the “Settings” – “User Management” section, it is possible to set different permissions for each user. Permissions are granted and administered by users with “Admin” rights (see previous question).

The following rights are available:

Admin
Has all rights and can grant authorisation to all other users of your company.

Show all devices
All devices of the company are visible under “My devices”. If this authorisation is not granted, only the devices that are personally assigned to this user are visible (assignment via “contact person” in the respective device).

Edit devices
Right to edit entries in visible devices (e.g. contact person, service contact, etc.).

Edit groups
Right to create/edit device groups (incl. master data, company logo) and to edit the MDE configuration of a device/device group.

Show all orders
All orders of your company are shown under “My orders”. If this authorisation is not granted, only orders for those devices that are personally assigned to this user (assignment via “contact person” in the respective device) are visible.

Show test-data management
The “Test-data management” is activated and all measurements of the company are displayed (incl. report/measurement data download).

Edit measurements
Allows the subsequent editing of measurements, i.e. editing the entries in the additional data (MDE).

Esders Connect App

The Esders Connect app

The Esders Connect app is a central link between the measuring devices and the Esders Connect online portal. Using the Esders Connect app, you can, for example, upload measurements from the device to the Esders Connect online portal and send reports to e-mail addresses, even if your measuring device does not have an integrated LTE module. The Esders Connect app also enables you to transfer changes made to devices in the Esders Connect online portal. This applies, for example, to configurations of additional data (MDE), additional menu items, device settings, languages or software updates. The Esders Connect app enables transfers between the measuring device and portal in both directions.

In addition, the Esders Connect app can be a link between your own app and our measuring device. For this purpose, we provide you with special connections/interfaces, which are explained in more detail in the area of special applications.

Transmit measured values live
Connect to a measuring device (currently available for HUNTER Gas detection & gas measurement device and Laser HUNTER Gas detection & Gas measurement device) to display measured values live on your smartphone or tablet. Once the app has recognized the measuring device, you have the option to activate real-time readings. The device will now automatically start the test and you can see the readings both on the measuring device and on your smartphone or tablet. The measurements are saved in the measuring device as usual and can then be edited and sent using the app so that they can be accessed from anywhere at any time.

You can use this function by ordering the „Remote Control” option for your new device or – for existing devices – retrofitting it on your measuring device. You can find our more informations here.

Smartphone Live Messung

The main functions of the app

Send completed measurements as a PDF report and upload to Esders Connect portal.
Connect to the measuring device via Bluetooth and read the measurement data memory. Choose up to three e-mail addresses to which a complete PDF report of the measurement will be sent. Before that, you have the option of entering additional data via the Esders Connect app or correcting it if necessary.

Enter additional data (MDE) via QR code/barcode.
In addition to the option of editing or subsequently entering additional data (MDE) and then sending the updated measurement, the Esders Connect app has been equipped with a QR code/barcode scanner. The data stored in a code can be transferred directly to an MDE field via the scanner. It is also possible to fill in several MDE entries at the same time using a QR code (in corresponding formatting). Detailed information on this can be found in the Q&A.

Updates and upgrades
In order to simplify the device update and to ensure that your devices work with the latest firmware, you can update the devices via the Esders Connect app. Every time a connection is established between the Esders Connect app and an Esders measuring device, it is checked whether a new firmware version is available for the measuring device. This also applies to an update of the configuration of the additional data (MDE) or to booked options (e.g. new menu items, new languages, etc.). These updates can now be easily installed via the app!

Documents
If you are registered in Esders Connect, you can log into the app and have access to various documents of your measuring devices. These include, for example, operating instructions, brochures, technical data sheets and much more.

Esders Connect App for all operating systems
The Esders Connect App is available for iOS as well as for Android. Particularly for Windows-phones or usage of a PC we developed a new software, which is called Esders Connect PC. For working with a PC we recommend to use the Esders LINK in order to avoid issues when connecting via Bluetooth.

Login now possible in the app
You can now log in directly into the app. In the online portal tab you can go directly to the portal and have access to your measurements, reports, devices and orders. You can request service appointments and view the status of an order while on the go in the app.

Q&A on Esders Connect App

  1. WELCOME
    The Esders Connect app enables you to send your measurement data directly to the office and to the Esders Connect online portal. We will accompany you on your way into the digital age and explain to you what happens next.
  2. CREDIT
    You can use our app free of charge to perform device updates, for example. To read completed measurements and upload them to the Esders Connect Portal or send the report to email addresses, you need a credit balance. Please contact us by telephone or e-mail for this.
  3. SETTINGS
    In the settings of this app, you can store up to three e-mail addresses to which the report of a performed measurement is sent. If you would like the GPS position of the mobile end device to be transferred to the map view in the Esders Connect online portal, you can also select it in the settings.
  4. CONNECTION
    Before you can read out and send measurements, you must connect the Esders measuring device to your smartphone or tablet via Bluetooth. The connection process checks whether updates are available for the Esders measuring device, which can be installed on request. After successful connection via Bluetooth, the measurements are read from the data memory of the Esders measuring device.
  5. ADDITIONAL DATA
    You can use this app to change the additionally entered data of a measurement (MDE) (order number, location data, etc.). You can either add missing data or modify existing entries. Entries can also be filled without text input with the smartphone camera via an integrated barcode and QR code scanner. You can then resend the updated measurement.
  6. INTERNET
    Information on the portal for further processing of reports.
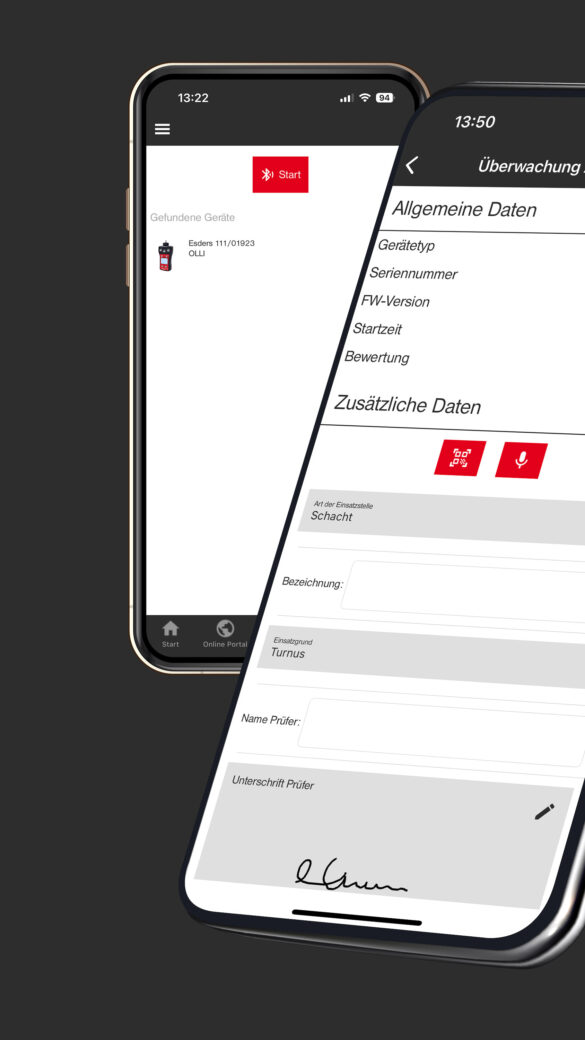
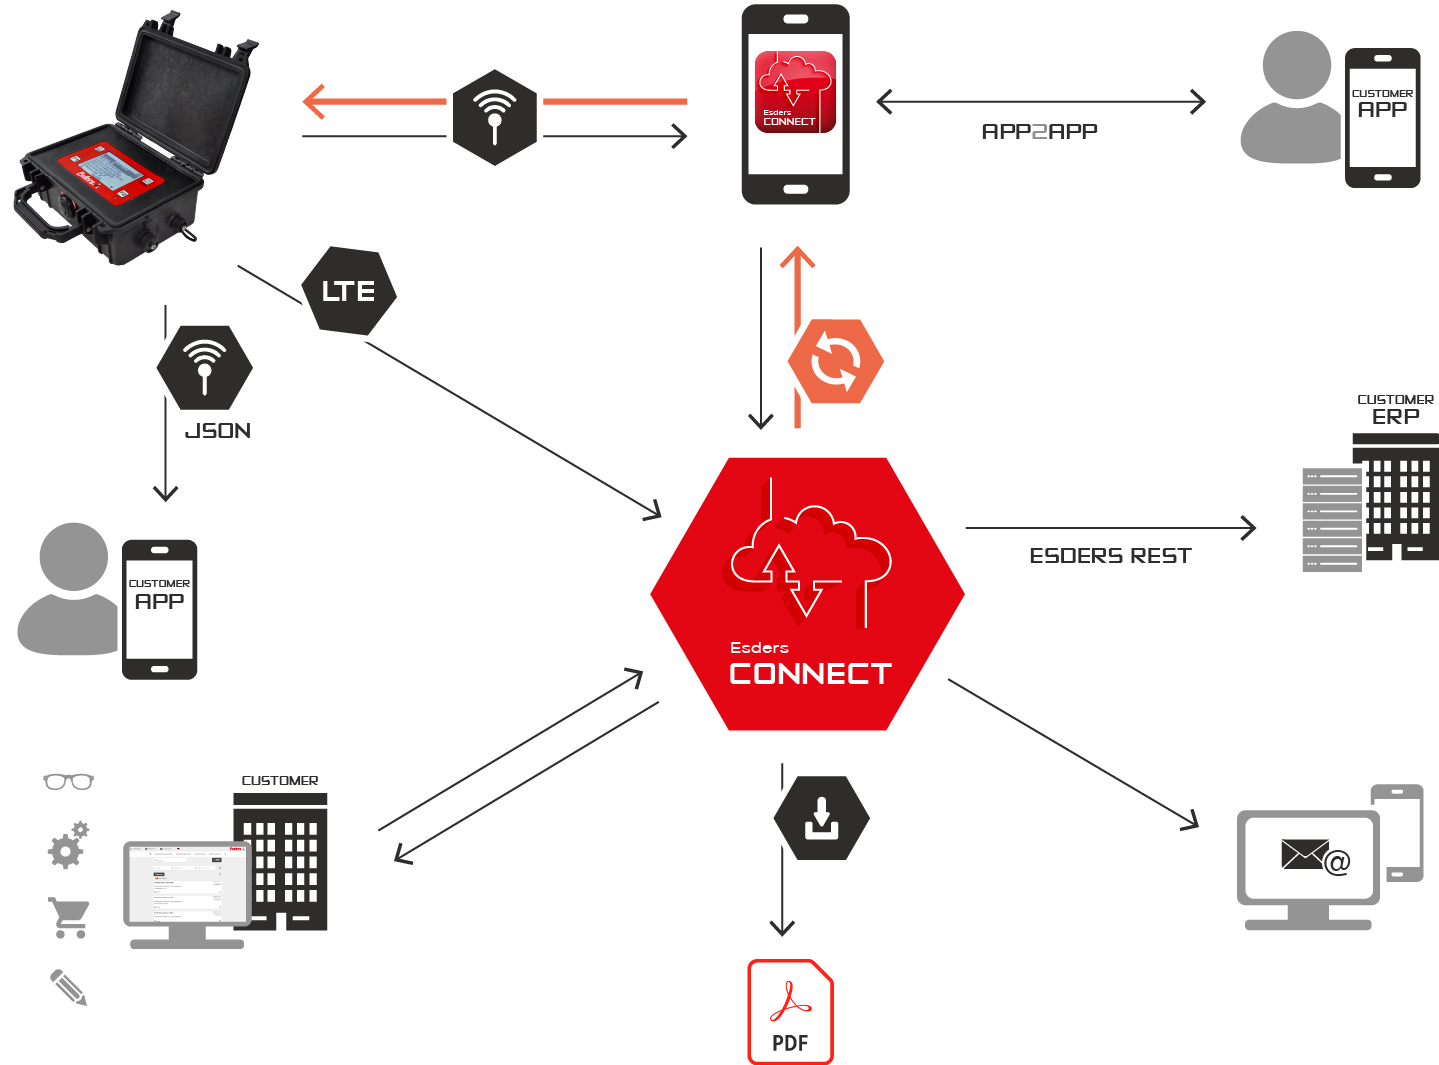
You can search and connect to your measuring device via the add symbol. By clicking on “Start”, the app searches for all measuring devices that are switched on and close by. If you have already connected your measuring device to the app previously, it will appear in the list of paired devices. Both the device name and the serial number are displayed. 
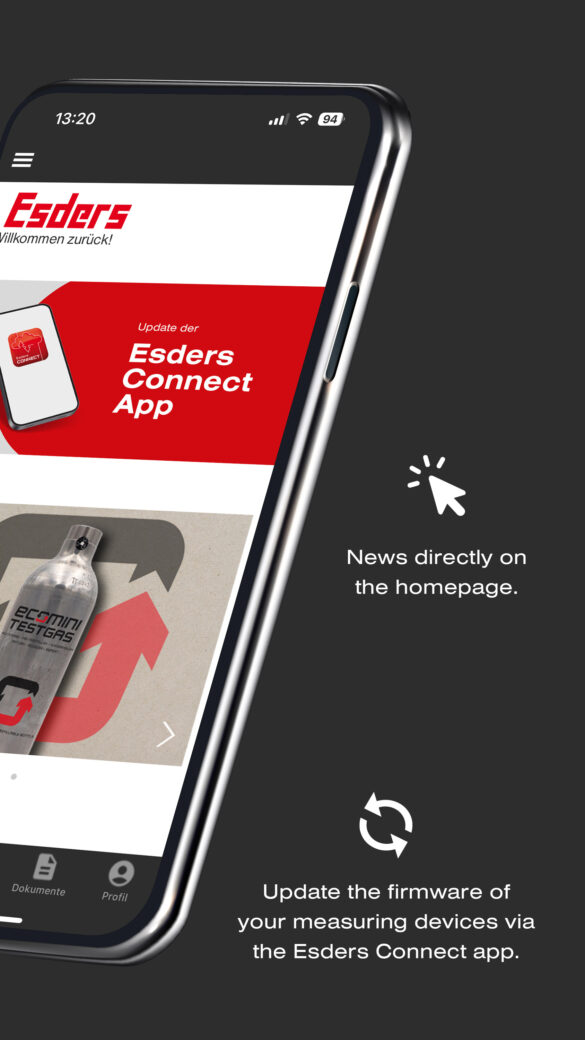
Having selected your measuring device, the app checks for available updates automatically in the background and lists all available measurements at the same time.
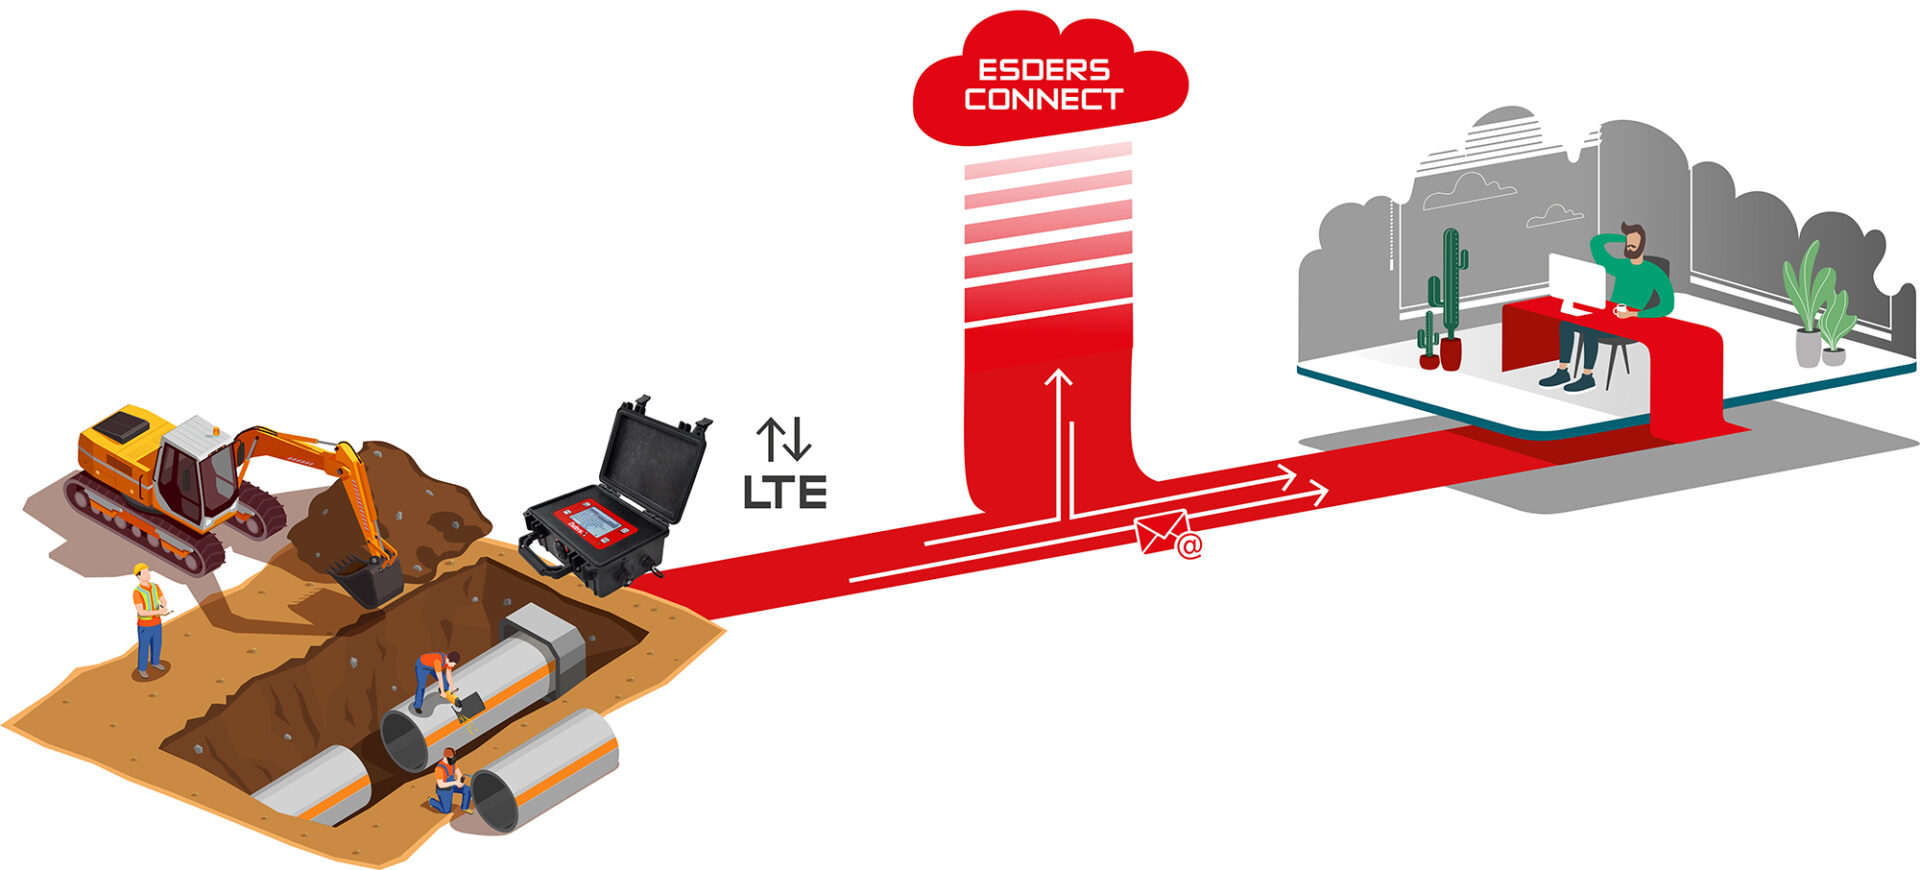
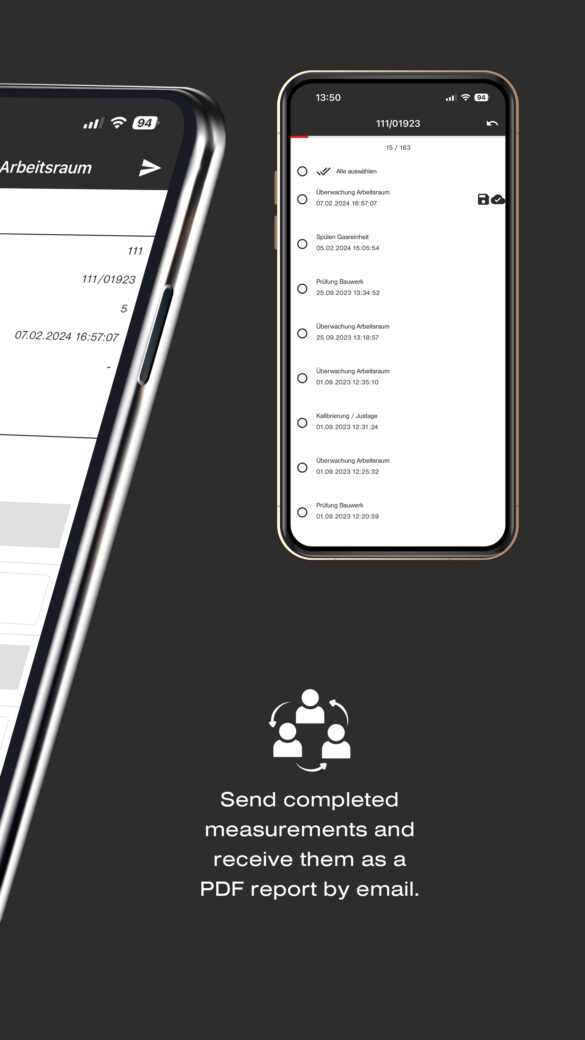
Once you have selected your measuring device, the app shows all available measurements. As soon as you have selected one or more measurements or clicked on “Select all”, the icon send to send all measurements appears at the bottom right. The reports are then sent to the e-mail addresses you have entered.

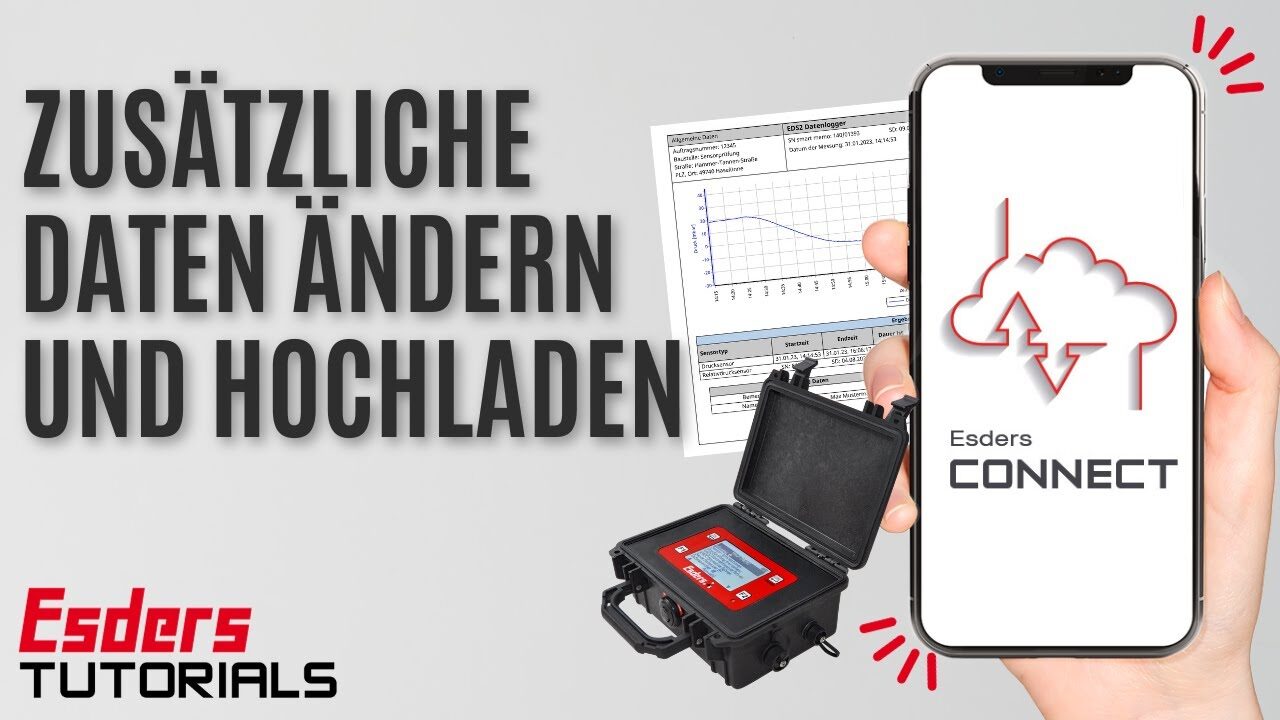
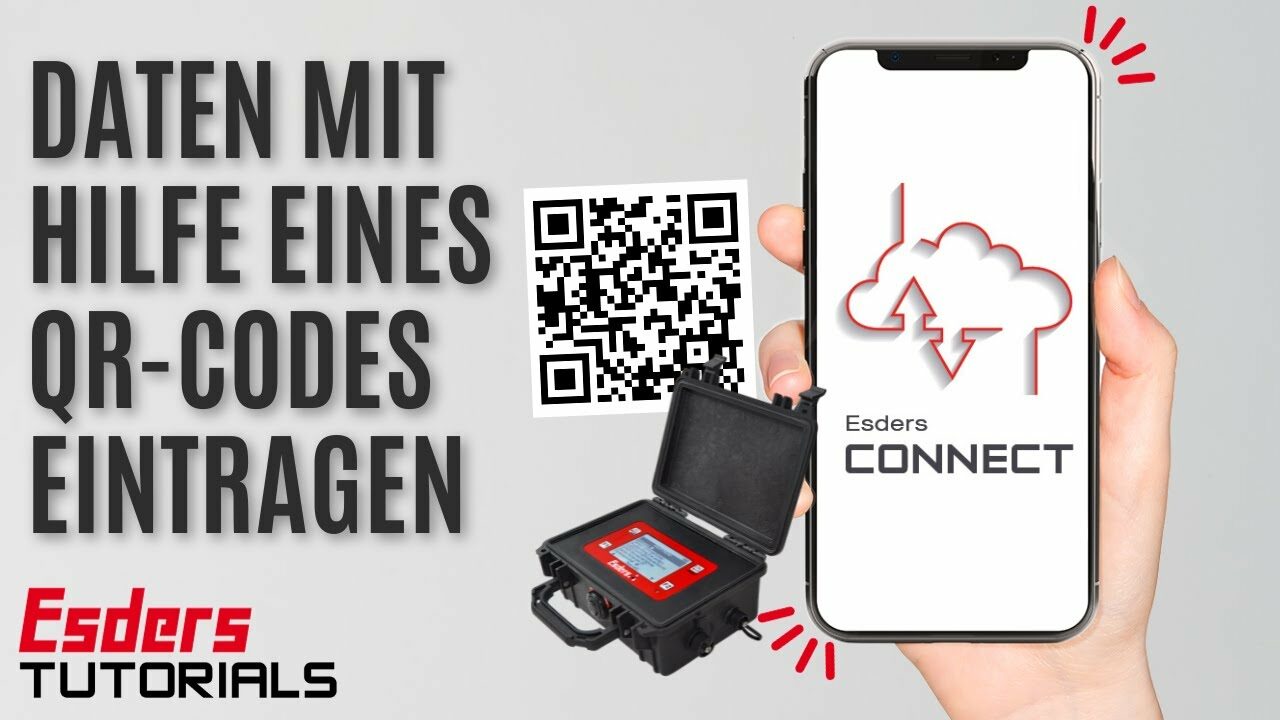
With the Esders Connect app, you have the option of entering additional data (MDE) by scanning a code (QR code, barcode, etc.). The most common code formats are supported.

We offer you two options for scanning:

  1. Store information as text in a code: By scanning the code, the Esders Connect app copies the stored text and asks you in which field of the additional data this text should be imported.
  2. Store several pieces of information as formatted text in a code and import several entries at the same time: By scanning the code, the Esders Connect app picks up the stored information and imports it automatically into the corresponding field. The information in the code must be formatted according to the following example.

Example of the following configuration of the additional data (MDE):

  • Order number
  • Construction site
  • Street
  • Postcode, city

The code should be configured as follows:

  • mde: order number=text1;
  • construction site=text2;
  • Street=Text3;
  • Postcode, city=text4;

After scanning the correctly formatted code, the Esders Connect app should display the following:

  • Order number: Text1
  • Construction site: Text2
  • Street: Text3
  • Postcode, city: Text4
For measuring devices, that don’t have an integrated GPS module, you have to activate the sending of GPS coordinates. To do this, you can tick the appropriate box in the app under Settings/Software settings. The prerequisite is that the Esders Connect app has access to the location data of the smartphone. 
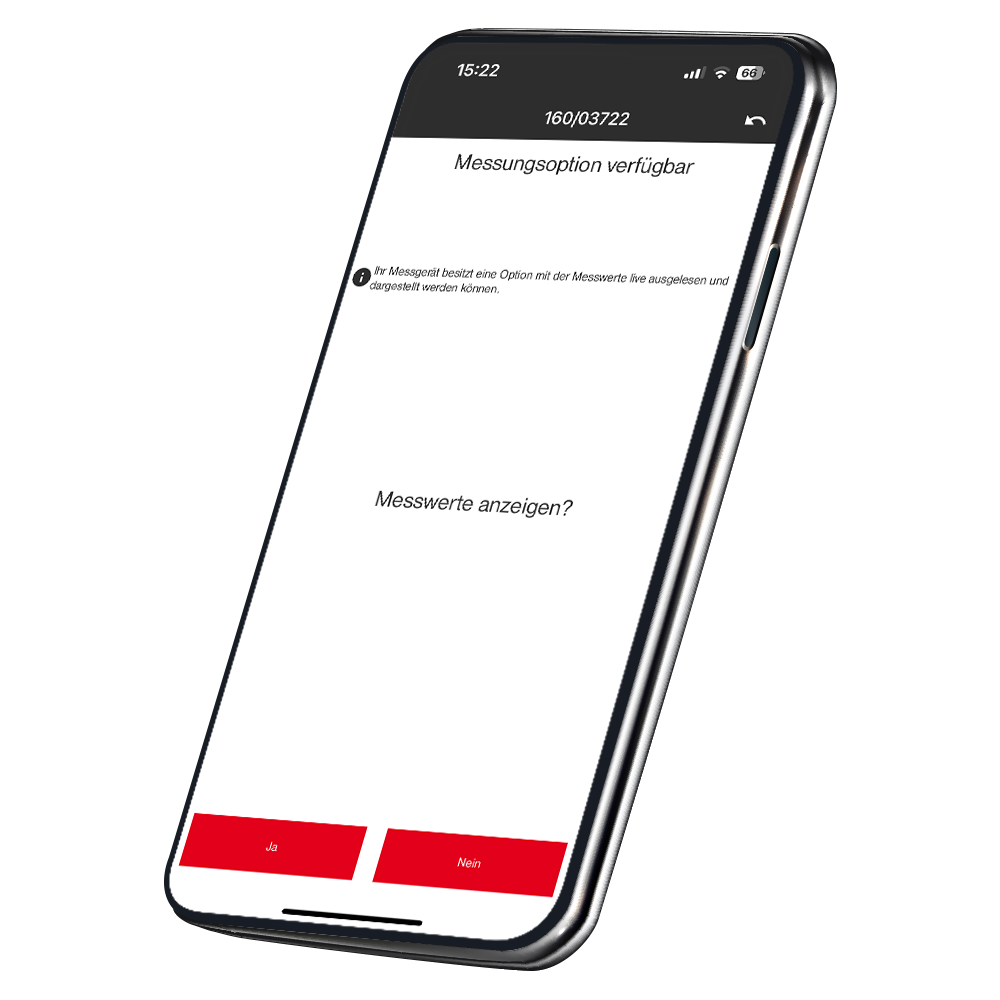
The GPS coordinates are only added if the measurement is sent immediately after completion.

Esders Connect in detail

So far, you have learned about the essential components of Esders Connect. You know how the Esders Connect online portal works and that the Esders Connect app has an interface function between the measuring device and the online portal. Our Esders Connect solution enables you to send your measurement data digitally and manage it centrally. If you would like to take a closer look and want a detailed view, we have compiled the networking and interfaces of our system in a graphic. The next section explains which special functions and interfaces are provided for you.

Special applications for data transmission

If you have special application requirements and if, for example, sending the PDF report by e-mail or the Esders Connect app is not exactly what you require, we offer further special applications in the field of data transmission. We have an individual solution for every component of our system, whether it’s a measuring device, Esders Connect app or the online portal. Our IT department has developed the following solutions for your IT:

  • Esders LTE Rest
    Individual data transfer from the measuring device directly to your ERP system
  • Esders JSON Protocol
    Individual data transfer from the measuring device via Bluetooth
  • App2App
    Individual communication of your app with the Esders Connect app

Curious?

Ask our technicians now and request a consultation.
We’ll get back to you promptly if you give us your contact details.

Privacy Settings
Durch Aufruf unser Onlinepräsenzen in sozialen Netzwerken

Durch das Aufrufen unserer Onlinepräsenzen in sozialen Netzwerken werden auch dort von Ihnen personenbezogene Daten von dem jeweiligen Anbieter verarbeitet. Bitte beachten Sie, dass Sie genauen Umfang, Zweck, Rechtsgrundlage, Speicherdauer und Ihrer Rechte bzgl. dieser Verarbeitungsvorgänge Ihrer personenbezogenen Daten auch den Angaben des jeweiligen Anbieters entnehmen müssen.

Durch Einbindung von Diensten Dritter

Aufgrund der Einbindung von Diensten Dritter auf unserer Webseite könnten personenbezogene Daten von Ihnen durch den jeweiligen Anbieter verarbeitet werden. Bitte beachten Sie, dass Sie dann Umfang, Zweck, Rechtsgrundlage, Speicherdauer und Ihrer Rechte bzgl. dieser Verarbeitungsvorgänge Ihrer personenbezogenen Daten auch den Angaben des jeweiligen Anbieters entnehmen müssen.

keyboard_arrow_up